Short Nerd Chief

Posts Tagged ‘Linux’

New from Google: Gadgets for Linux and Gmail Labs

Posted by Fred on June 9, 2008

Over the past couple of days, Google has rolled out a couple of interesting new products, a version of Google Gadgets for Linux and Gmail Labs, a testbed for new features for Gmail.

Google Gadgets for Linux is about what you’d expect, an implementation of Google’s gadget platform, previously available only to Windows and Mac users, for either the GTK+ or QT toolkits.  For those who care about such things, GGL is licensed under the Apache License, rather than the closed-source license for the other platforms.  To install, you’ll need to build from source, which is not a big deal, although it does require an Ubuntu user to jump through some hoops first.

The first step is to install some additional packages, if you don’t do much development work:

sudo apt-get install subversion build-essential zlib1g-dev libmozjs-dev libcurl4-openssl-dev libxml2-dev libdbus-1-dev libmozjs-dev libgstreamer-plugins-base0.10-dev libcurl3-openssl-dev libdbus-1-dev libxul-dev libcurl3 libcurl3-dbg libcurl3-gnutls libcurl4-openssl-dev libcurl-ocaml libmozjs0d libmozjs0d-dbg libmozjs-dev g++-4.2-multilib g++

Some of these packages may already be installed, many undoubtedly are not.  Now download the source from Google.  You can get a source package, but it may be outdated, so I used the svn repository.  From a terminal, do this:

svn checkout http://google-gadgets-for-linux.googlecode.com/svn/trunk/ google-gadgets-for-linux-read-only

Assuming you’re using the svn repository, prepare the build script:
cd google-gadgets-for-linux-read-only
sh autotools/bootstrap.sh

Now configure and build from the source code:
mkdir -p build/debug
cd build/debug
../../configure --enable-debug --disable-qt-host --disable-qt-system-framework --disable-qt-xml-http-request --disable-libggadget-qt --disable-qtwebkit-browser-element
make
sudo make install
sudo ldconfig

To start the sidebar, hit ALT-F2 and run ggl-gtk.  An icon will appear in the panel, which you can right-click to add gadgets.  To run at startup, click System>Preferences>Sessions and add ggl-gtk to the Startup Programs tab. If you want to use QT, build using just ../../configure –enable-debug and run ggl-qt instead.

Gmail Labs adds some experimental features to Gmail, many of which probably could be added via Greasemonkey scripts.  Unlike Greasemonkey, the Gmail labs features appear to be available in any browser.  To turn Gmail Labs on, go to Settings/Labs and enable features one at a time.  As of this writing, there are 13 available, ranging from Custom Date Formats, which “adds options to the general settings page allowing the date and time format to be changed independent of language. For example, you can use a 24-hour clock (14:57) or show dates with the day first (31/12/07)” to Signature Tweaks, which “places your signature before the quoted text in a reply, and removes the ‘–‘ line that appears before signatures.”  Most of these don’t do much for me, but there are two I enabled:

Quick Links “adds a box to the left column that gives you 1-click access to any bookmarkable URL in Gmail. You can use it for saving frequent searches, important individual messages, and more.”  Open any Gmail view, such as an individual message or a search, and click Add Quick Link.  The most useful application for Quick Links is with searches.  Add a link for is:unread to quickly view unread messages or has:attachment to find messages with attachments. Quick Links would also be a good way to find message from certain correspondents.

Superstars adds new icons to the default star for marking messages. You get additional stars in new colors, along with a check mark, exclamation point and question mark.  To use, you have to enable on the Settings/Labs page and then choose the stars you want available on the Settings/General page.

Presumably Gmail will keep adding Labs features, which will appear on the settings page.  if any feature messes up your inbox, just go to https://mail.google.com/mail/?labs=0 to disable Labs.

Posted in Technology, Ubuntu | Tagged: , , | Leave a Comment »

Install Ubuntu 8.04 on Compaq Presario A900 laptop [HOWTO]

Posted by Fred on May 2, 2008

UbuntuLozengeStrapLogo compaq_qwubi_logo 

I have a Compaq Presario A900 notebook that I picked up cheap at Staples a while back.  It’s actually pretty decent, with a crisp 17″ screen and full desktop-style keyboard.  It came with Vista Home Premium and sufficient RAM to run it with Aero turned on.  With the recent release of Ubuntu Hardy Heron (8.04), I decided to see how hard it would be to install.  Ubuntu on a desktop is a piece of cake, but what about on a lower-end notebook?  It was pretty easy, with one sizable glitch.

The complicating factors here are (1) I have a CD burner but no blank media and (2) I have only a wireless Internet connection. So that means installing from CD won’t work and as it turned out I should have planned ahead for getting the WiFi working.  The first step is to grab some files.  I decided to install via Wubi, which installs Linux within a file in the Windows filesystem.  There are valid reasons not to do this and to install to a standard partition instead (which you can do without a CD via Netboot), but at this point it’s not clear how Ubuntu on this notebook is going to work out, and uninstalling Wubi is no different than any other Windows program.  Eventually, we’ll move the Wubi install to a dedicated partition if all goes well.  Here’s what you’ll need:

  • The Wubi installer for version 8.04
  • ISO for the Ubuntu 8.04 desktop CD.  This is not strictly necessary, as Wubi will download the files for you, but I found that grabbing the ISO directly was orders of magnitude faster.  This may change once the download servers cool down from the new release of 8.04.
  • The packages for ndiswrapper, which enables Linux to use Windows drivers for the Broadcom wireless chipset in this notebook. This is only necessary because I had no other way to get an Internet connection.  Some have reported better success installing from source, but the Ubuntu packages worked fine for me (which is good, because satisfying the dependencies manually would be a real hassle).  You’ll need both ndiswrapper-common and ndiswrapper-utils-1.9.
  • Windows drivers for the Broadcom chipset. To make things easier later, I put the two *.deb files and the Broadcom package on a USB stick, but you will be able to access your Windows directories via Ubuntu if needed (look in the directories /host and /media).

wubi 
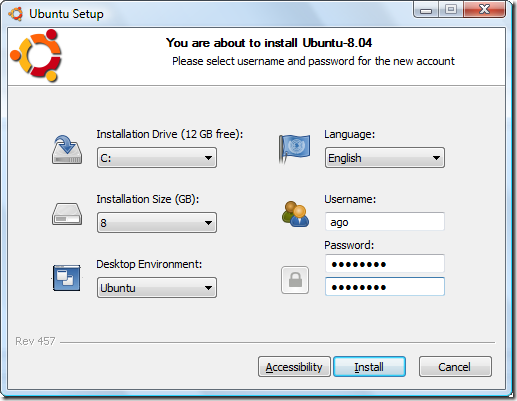
Step 1: Make sure the Wubi installer and the Ubuntu ISO are in the same directory and run Wubi.  All you need to do is tell the installer how much space to give Wubi (the minimum is 4 GB, but I gave it 15), which drive to install to and a username and password.  You can also pick a desktop environment – Ubuntu gives you Gnome, Kubuntu is KDE and Xubuntu is XFCE.  After that it’s fully automated – the Wubi website explains the process.  After two reboots (be sure to pay attention and pick Ubuntu from the boot menu, or you’ll end up in Vista and have to reboot), you’ll get the Ubuntu log-in screen.

Step 2: Log into Ubuntu using the username and password you picked earlier.  You’ll get the default Gnome desktop. You can do many things, but you’ll notice you have no wireless connection. Indeed, Ubuntu doesn’t even think there is a wireless card present, because we haven’t told it to use an appropriate driver.  This is where planning ahead comes into play – we need ndiswrapper, but we can’t use Synaptic without a network connection.

Step 3: Plug in your USB stick.  A Nautilus window will pop up, and you can drag drag the two *.deb files and the Broadcom file to your home directory. Again, not strictly necessary, but it will make things easier.  If you’re not using a USB stick, choose Places — Computer on the top panel.  Double-click on filesystem and then host and you’ll see your Windows files, where you’ll find the three files in question.

Step 4: It’s easiest to use the Terminal at this point, so choose Applications–Accessories–Terminal.  Issue the following command:

sudo dpkg -i *.deb

You’ll be prompted for your password, and then the two ndiswrapper packages will be installed. To make ndiswrapper work, we’ll need to tell it what driver to use.  First uncompress the Broadcom file:

tar -xzvf WLANBroadcom.tar.gz

This will give you a directory full of driver files, of which we only really need two.

Step 5: Tell ndiswrapper what files to use by issuing the following commands in the terminal:

cd WLANBroadcom
sudo ndiswrapper -i bcmwl5.inf
sudo ndiswrapper -l
sudo modprobe ndiswrapper
sudo ndiswrapper -m

Time to edit a configuration file to add ndiswrapper. Linux evangelists will tell you to use vim or emacs, depending on their particular denomination, but I’m lazy, so:

sudo gedit /etc/modules

At the end, add a new line that says “ndiswrapper” (without the quotes). Exit and save.

Step 6: Almost done, but Hardy Heron has a bug that causes a conflict between ndiswrapper and another package, meaning ndiswrapper still doesn’t work. We need to work around this bug.  Back in the terminal, run this command:

sudo gedit /etc/init.d/wirelessfix.sh

In the gedit window, paste the following:

#!/bin/bash
modprobe -r b44
modprobe -r b43
modprobe -r b43legacy
modprobe -r ssb
modprobe -r ndiswrapper
modprobe ndiswrapper
modprobe b44


Exit and save.  back in the terminal, issue these commands:

cd /etc/init.d/ && sudo chmod 755 wirelessfix.sh
sudo update-rc.d wirelessfix.sh defaults

Step 7: Reboot, and voila! Wireless should be working.  I know this works on the Presario, but the same steps should work on any notebook with this Broadcom chipset, including several other HP/Compaq products and Dell notebooks with the 1350 WLAN Mini-PCI Card.

[resources used include Invaleed’s howto for Ubuntu 7.10, and Ubuntu Forums howtos from HokeyFry and Mazza558]

Posted in Technology, Ubuntu | Tagged: , , , , , , , | 8 Comments »

Update on the NAS Project

Posted by Fred on November 6, 2007

I was a couple of days late getting started, but I got underway with my project to add a server to the home network last night.  I decided to repurpose an old eMachines T1440 desktop.  This had been the kids’ PC, back in the days we maintained a real home office.  The default configuration is a 1.4 GHz Celeron processor, Intel 810e chipset, 128 MB RAM, integrated Intel Direct AGP 3D graphics and a 40 GB hard drive.  Before starting, I upped the RAM to 512 MB and added a Western Digital 320 GB secondary drive.  There’s space in the case for a couple more drives, if necessary.  The Linux compatibility lists suggest this hardware should be supported.

In the end, I decided to go with an install of Xubuntu 7.10.  FreeNAS would have been an easier install, but I decided I wanted the flexibility of a full Linux install, so I could add additional services later.  In particular, I think I want a LAMP server, BitTorrent and FTP now, with firewall and web serving to come.  So I grabbed the 7.10 torrent and burned it to a CD.  Therein the problems began.  The first burn must have been bad, as the Live CD wouldn’t boot.  back to the other desktop for another disk burned at a slower speed. This one booted slowly, but successfully.

The Xubuntu graphical installer is a breeze, although I had to do some manual partitioning to set up the drives the way I wanted.  Eventually it started the install, and all was well until I got to “installing language packs” and a counter that suggested there were 617 minutes remaining.  Apparently it was downloading packages or at least package headers, which really shouldn’t have been necessary for an English install.  It didn’t take 617 minutes, but I gave up after 45 and let it run.  This morning, it appeared to be done.

So that’s it so far.  Two hours in, and I have two simple hardware upgrades and a base Xubuntu install.  Frustrating, to say the least, but perhaps the issue(s) relate to the burned CDs.  I’ll move on to configuring the Samba server later.

Posted in Technology | Tagged: , , | Leave a Comment »

This weekend’s project: NAS

Posted by Fred on November 2, 2007

Now that I picked up that $348 laptop, the house has five computers – two kind of creaky desktops (a Dell Dimension, circa 1998 and a more recent eMachine that had been the kids’ PC) and three laptops (one running XP and two running Vista).  The Dell gets regularly backed up to a USB drive, as that is where the photos, videos and music are stored, but there are still files scattered everywhere, and the other computers are never backed up other than important files to a couple of USB keys.  Everything runs through the router, so it’s time to do something about it.  Time to build a file server.  I’ve decided to trash the eMachine’s drive and dedicate it to storage, as it’s not being used and a basic NAS doesn’t require a lot of firepower.  I picked up a 320 GB drive to start and 512 MB of SDRAM.  The way I see it, these are the basic choices:

  • Just leave it running XP, turn on file sharing and be done with it.  This is not acceptable, but would certainly be easy (price: $0).
  • FreeNAS, a simple NAS based on FreeBSD.  It’s basic, but relatively easy to install (price: $0).
  • Openfiler, a CentOS linux-based distribution that can run a NAS or SAN solution.  This one’s a lot more powerful than FreeNAS, but also more complicated (price: $0).
  • One of the commercial Linux-based file/firewall/web server solutions, such as ClarkConnect, NASlite or SME Server.  These do a lot more than file storage, but are probably overkill for my needs (price: $0 to $435, depending on the version).
  • Install Ubuntu (more likely Xubuntu) and install Samba, FTP, LAMP, etc. Ubuntu is obviously as powerful as one makes it (price: $0).
  • Install Windows Home Server (price: $179 for the OEM edition from Newegg).

I’m leaning toward starting with FreeNAS because it seems simple (and free).  I have to say that WHS is tempting, as it includes web access to files and automatic router configuration and port forwarding. I can do all of that in BSD or Linux, but I’d have to do the work myself.  Thoughts? Comments?

Posted in Technology | Tagged: , , , | 2 Comments »